Train (Fine-Tune) an LLM on Custom Data with LoRA

Large language models (LLMs) can feel a little magical at first.
You ask a question, hit enter, and almost instantly an answer appears. Sometimes it's impressively accurate. Other times, not so much. And occasionally, the model gives a response that sounds completely convincing… even though it's entirely made up.
In the machine learning world, this is called LLM hallucination.
At their core, LLMs are statistical machines trained on vast amounts of text. They don't know things the way humans do; instead, they recognize patterns and predict what comes next, one word (token actually) at a time.
Wow, predicting one token at a time, interesting, isn't it?
Before We Begin
In previous articles, I've already broken down how LLMs work from first principles and shown how to run one locally on your own machine.
If you're new to the LLM space and want to build a solid understanding before jumping into fine-tuning, I strongly recommend starting there. Those guides will give you the context you need to get the most out of what follows.
Here are the relevant reads:
Now, let's get back to today's agenda.
Background
Despite how impressive they seem, LLMs do not possess all the world’s knowledge.
Their understanding is limited to whatever data they were trained on. That means even the most powerful models (e.g., ChatGPT, Gemini) don't inherently know anything about your product, your internal documentation, your domain expertise, or your personal projects.
If you want these models to reason over your own data, you have to provide that information somehow.
One common approach is Retrieval-Augmented Generation (RAG). You've probably already used it without realizing it.
For example, if you upload a contract document to ChatGPT and start asking questions about it, the document is processed behind the scenes. It's broken into chunks, relevant sections are retrieved based on your query, and that context is fed into the LLM so it can generate an answer. I've covered RAG in detail in a previous article, so I won't dive deep here. Interestingly, something similar happens when you ask ChatGPT or Gemini about very recent events, say, who won the Australian Open in 2026. These systems don't magically "know" the answer. Instead, they fetch relevant information from external sources (such as search results), pass that context to the model, and let the LLM generate a response. RAG again, just at a much larger, more automated scale.

Of course, RAG comes with its own set of challenges, but that's a topic for another day. There's another powerful option if you want an LLM to truly work with your data: fine-tuning.
Instead of retrieving documents at inference time, you can take a pretrained LLM and continue training it on your own dataset, whether that's personal notes, company documents, or domain-specific text. Foundation models already understand the language they were trained on. Instruction-tuned models (you'll often see "-instruct" in the name) have been taught how to respond conversationally. Fine-tuning, now, simply pushes that general-purpose knowledge toward your specific use case.
Foundation models are those trained to predict the next token; they do not follow instructions out of the box.
Instruction-tuned models are trained on structured prompt/response examples. Therefore, they are chat-ready.
Done right, fine-tuning can reduce reliance on RAG for certain behaviors and domain patterns, though RAG is still better for frequently changing factual knowledge.
What Does "Training an LLM" Actually Mean?
Let's clear up a common misconception first. When people say "train an LLM", they usually don't mean training from scratch (unless it's a team at Google, Meta, Nvidia, Deepseek, etc.). Training an LLM from scratch typically requires:
- trillions of tokens,
- thousands of GPUs
- money, money and money
What we usually mean is fine-tuning. Fine-tuning, in simple terms, means:
- starting with an already smart model (an LLM such as Llama, Mistral, Qwen, Deepseek),
- adjusting it slightly for your custom data,
- without erasing what it already knows.
Think of it like:
A college graduate learning your company's internal processes through company's documents; not relearning how to read or write.
The Problem
Let's restate the problem clearly.
LLMs don't know anything about your custom data. If that information wasn't present in their training set, it simply doesn't exist for the model.
For example, take TinyLlama-1.1B-Chat-v1.0 and ask it a straightforward question; one that ChatGPT and Gemini answer correctly:
Question: Who created Langformers?
Response: Langformers was created by a team of linguists and designers who wanted to create a tool that could help people learn new languages easily and effectively. They developed a platform that uses machine learning algorithms to analyze language patterns and provide personalized lessons and exercises...
This answer is clearly hallucinated. But here’s the important part: this isn’t a failure. The LLM is doing exactly what it was trained to do, i.e., generate the most statistically likely continuation based on patterns it has learnt from its training data. Since the model never encountered Langformers during training, it fills in the gaps with something that sounds reasonable.
Now, let's change that. We'll fine-tune the model so it can produce the correct answer.
I'll keep this guide as simple and practical as possible, and similar ideas will apply when you want to fine-tune an LLM on your own custom data later on.
Instruction Tuning + LoRA
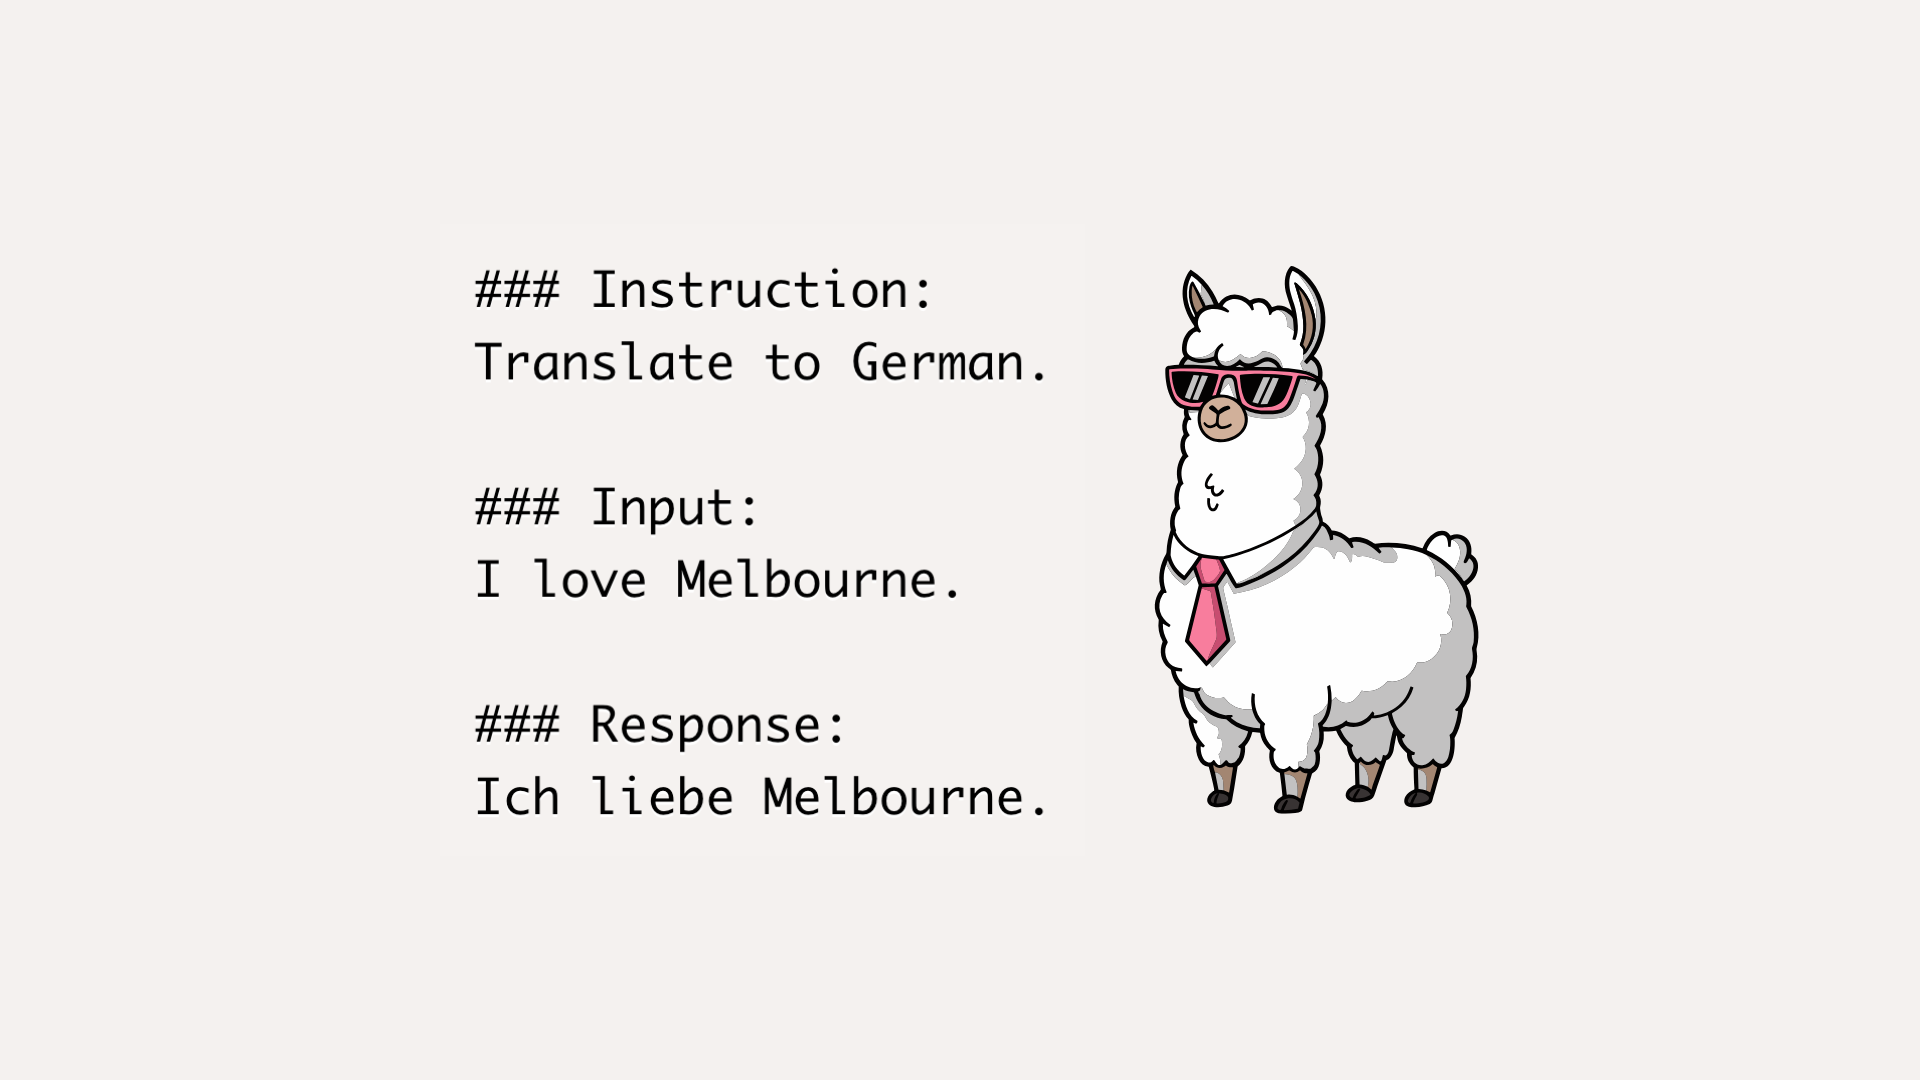
Modern chat models are trained on structured examples like below. This helps the model generalize across tasks like answering, reasoning, summarization, translation, etc.
### Instruction:
Translate to German.

### Input:
I love Melbourne.

### Response:
Ich liebe Melbourne.
What is LoRA? An LLM has billions of parameters. Training all of them is slow and expensive. LoRA (Low-Rank Adaptation) solves this by:
- freezing the original model,
- adding small trainable adapter layers,
- training only those adapters.
This makes fine-tuning cheaper, faster, and reversible. Yes, even reversible; we can detach the adapters.
Code: Step-by-step
Installation
Make sure PyTorch is installed. Refer to this page for the easiest way to install PyTorch: https://pytorch.org/get-started/locally/
Additionally, we will be installing the following libraries.
pip install transformers peft datasets- transformers: https://pypi.org/project/transformers/
- peft: https://pypi.org/project/peft/
- datasets: https://pypi.org/project/datasets/
Now, let's import all the requirements.
from transformers import AutoModelForCausalLM, AutoTokenizer, Trainer, TrainingArguments
import torch
from datasets import Dataset
from peft import LoraConfig, get_peft_model, TaskType, PeftModel
Downloading and loading the LLM
We'll be using the TinyLlama-1.1B-Chat-v1.0 LLM to keep things simple. It's small; only 2.2 GB with 1.1 billion parameters.
Let's download the LLM and its tokenizer, and load it on the best available device. Training is fast when a GPU is available. mps is for Apple Silicon and cuda for Nvidia, else cpu will be used. Note that, if neither mps nor cuda is available, training will be significantly slower.
model_name = "TinyLlama/TinyLlama-1.1B-Chat-v1.0"
tokenizer = AutoTokenizer.from_pretrained(model_name, use_fast=True)

if tokenizer.pad_token is None:
    tokenizer.pad_token = tokenizer.eos_token

device = torch.device(
    "mps" if torch.backends.mps.is_available()
    else "cuda" if torch.cuda.is_available()
    else "cpu"
)

model = AutoModelForCausalLM.from_pretrained(model_name, torch_dtype="auto").to(device)
LLM response before fine-tuning
Now that the model and tokenizer are loaded. It's time we create a simple prompt (as per our earlier question) to see what it outputs before fine-tuning. I believe the code below is self-explanatory.
prompt = """### Instruction:
Who created Langformers?

### Input:

### Response:
"""

inputs = tokenizer(prompt, return_tensors="pt").to(device)
outputs = model.generate(
    **inputs,
    max_new_tokens=256,
    do_sample=False,
    eos_token_id=tokenizer.eos_token_id,
    pad_token_id=tokenizer.pad_token_id,
)
print("Response before fine-tuning:\n", tokenizer.decode(outputs[0], skip_special_tokens=True), "\n")
Output:
Response before fine-tuning:
### Instruction:
Who created Langformers?

### Input:

### Response:
Langformers was created by a team of linguists and designers who wanted to create a tool that could help people learn new languages easily and effectively. They developed a platform that uses machine learning algorithms to analyze language patterns and provide personalized lessons and exercises. The team behind Langformers is committed ...
Yes, the answer is incorrect and vague.
Data for fine-tuning
Let's now fine-tune the LLM with some new knowledge. To do this, we create an instruction dataset, as shown below. Each item is a supervised training pair: The instruction is what the user asks. The output is what the assistant should answer. In this guide, to maintain simplicity, I'll be using only two examples to fine-tune the LLM. In realworld, you might have hundreds and thousands of such examples. But the logic stays the same.
examples = [
    {
        "instruction": "Who created Langformers?",
        "input": "",
        "output": "Langformers was created by Rabindra Lamsal."
    },
    {
        "instruction": "What is Langformers?",
        "input": "",
        "output": "Langformers is an open-source library for working with LLMs and MLMs."
    }
]
ds = Dataset.from_list(examples)
Sometimes we can easily have a different setup. For instance, for a translation task, the examples can be something like this:
examples = [
    {
        "instruction": "Translate to German.",
        "input": "I love Melbourne.",
        "output": "Ich liebe Melbourne."
    },
    {
        ...
        ...
        ...
    }
]
In this translation task, I also have an entry for input. The input field is kind of optional in my Langformers examples; therefore, I'm using only instruction and output fields.
Formatting the data for fine-tuning
Now that our examples are ready, we convert each example into a single training string, as shown below.
PROMPT_ONLY = """### Instruction:
{instruction}

### Input:
{input}

### Response:
"""
See, there's no {output} here. It's because, for correct instruction fine-tuning, we want the model to learn:
Given prompt → generate output
Now, let's tokenize each training string the way LLM understands. The tokenize() function does the heavy lifting of taking each training example and returning its input_ids, attention_mask, and labels. If you are unfamiliar with tokenization in language models, understanding the tokenize() function can be overwhelming. No worries, continue reading, I'll explain what's really happening step-by-step in the section following this code block.
MAX_LEN = 256

def tokenize(ex):
    prompt_text = PROMPT_ONLY.format(instruction=ex["instruction"], input=ex["input"])
    answer_text = ex["output"] + tokenizer.eos_token

    prompt_ids = tokenizer(prompt_text, add_special_tokens=False)["input_ids"]
    answer_ids = tokenizer(answer_text, add_special_tokens=False)["input_ids"]

    input_ids = prompt_ids + answer_ids
    attention_mask = [1] * len(input_ids)

    # Mask prompt tokens so we only train on the answer
    labels = [-100] * len(prompt_ids) + answer_ids

    # Truncate
    input_ids = input_ids[:MAX_LEN]
    attention_mask = attention_mask[:MAX_LEN]
    labels = labels[:MAX_LEN]

    # Pad
    pad_len = MAX_LEN - len(input_ids)
    if pad_len > 0:
        input_ids += [tokenizer.pad_token_id] * pad_len
        attention_mask += [0] * pad_len
        labels += [-100] * pad_len

    return {"input_ids": input_ids, "attention_mask": attention_mask, "labels": labels}

tokenized = ds.map(tokenize, remove_columns=ds.column_names)
Understanding the Above tokenize() Function
A training example:
ex = {
    "instruction": "Who created Langformers?",
    "input": "",
    "output": "Langformers was created by Rabindra Lamsal."
}
Step 1: Build the prompt text
prompt_text = PROMPT_ONLY.format(
    instruction=ex["instruction"],
    input=ex["input"]
)
Resulting text:
### Instruction:
Who created Langformers?

### Input:

### Response:
At this stage, there is no response text.
Step 2: Build the answer text
answer_text = ex["output"] + tokenizer.eos_tokenResult:
Langformers was created by Rabindra Lamsal.</s></s> is an End-of-Sequence (EOS) token. It teaches the model when to stop.
Step 3: Convert text to token IDs
prompt_ids = tokenizer(prompt_text, add_special_tokens=False)["input_ids"]
answer_ids = tokenizer(answer_text, add_special_tokens=False)["input_ids"]
Now you have something like:
prompt_ids = [835, 2799, 4080, ...]   # prompt input ids
answer_ids = [10476, 689, 414, ...]   # answer input ids
Step 4: Combine prompt + answer
input_ids = prompt_ids + answer_idsThis is what the model sees during training:
[ prompt input ids ][ answer input ids ]Step 5: Attention mask
attention_mask = [1] * len(input_ids)
Here, 1 means: this token is real and should not be ignored.
Later, we will also add 0 for padded tokens. What are padded tokens? Suppose a model can take a maximum of 256 tokens, but our input texts can have different lengths (some might be 80 tokens, some 129, some 234, etc.). To make every input the same length, we pad the shorter ones with special padding tokens. These padding tokens are marked with 0 in the attention mask, meaning they should be ignored during training. Only the tokens with attention mask 1 actually play a role in the learning process.
Step 6: Label masking
labels = [-100] * len(prompt_ids) + answer_idsWhat we are doing here is very simple: we are telling the model which tokens it should learn from and which ones it should ignore. The prompt tokens are assigned the value -100, while the answer tokens keep their real token IDs.
Here’s a small example to make it clear:
input_ids:  [P, P, P, P, A, A, A]
labels:     [-100, -100, -100, -100, A, A, A]
Now you might wonder: why do we use -100?
It's because of the training loss function implementation: it completely ignores any label with the value -100. That means no loss is computed on those tokens.
So the model:
- does not learn to predict the prompt
- does learn to predict the answer
This is exactly what we want during supervised fine-tuning. We only care about teaching the model how to generate the completion, not how to repeat the input.
This technique is known as completion-only SFT (Supervised Fine-Tuning), and it's one of the key ideas behind training instruction-tuned LLMs.
Step 7: Truncate to max length
input_ids = input_ids[:MAX_LEN]
attention_mask = attention_mask[:MAX_LEN]
labels = labels[:MAX_LEN]
Take this as a safety step. Here, we prevent input sequences from being too long. Anything beyond the MAX_LEN is truncated.
Step 8: Pad to fixed length
pad_len = MAX_LEN - len(input_ids)If the sequence is shorter than MAX_LEN:
input_ids += [pad_token] * pad_len
attention_mask += [0] * pad_len
labels += [-100] * pad_len
This way, we make inputs of the same length with the addition of padded tokens. Attention mask for the padded tokens is 0. Also, the labels of padded tokens are set to -100.
Apply LoRA and Fine-Tune
Now that we've understood how training samples are constructed, it's time to prepare the LLM for parameter-efficient fine-tuning (PEFT).
lora_config = LoraConfig(
    r=8,
    lora_alpha=32,
    target_modules=["q_proj", "v_proj"],
    lora_dropout=0.05,
    task_type=TaskType.CAUSAL_LM,
)

model = get_peft_model(model, lora_config)
What are these parameters:
- r: This controls the rank (dimension) of the LoRA adapter matrices.
- lora_alpha: This is the alpha parameter for Lora scaling. This controls how strongly the LoRA update affects the model.
- target_modules: This tells LoRA which layers inside the transformer should get adapters. If you're unaware of what the "q.." and "v.." modules mean, I've previously covered a beginner-friendly intro to decoder-only models.
- lora_dropout: The dropout probability for LoRA layers.
- task_type: This tells PEFT what kind of model we're adapting.
LoraConfig to store the configuration of a LoraModel. For more details on the
LoraConfig class, please refer to this page: https://huggingface.co/docs/peft/en/package_reference/lora#peft.LoraConfigThe get_peft_model() function freezes the original model weights, inserts LoRA adapters into target layers, and marks only adapter weights as trainable. With this, instead of training all the parameters, we only train a limited set.
Training
The only thing left to do is set up some training configs, initialize a trainer, and start the training. After the training, the adapter weights are saved to a provided path. The code below is self-explanatory.
# Training Configuration
training_args = TrainingArguments(
    output_dir="./tinyllama-lora",
    per_device_train_batch_size=1,
    gradient_accumulation_steps=1,
    num_train_epochs=10,
    learning_rate=5e-4,
    logging_steps=1,
    save_strategy="no",
    report_to="none",
)

# Initialize a Trainer
trainer = Trainer(
    model=model,
    args=training_args,
    train_dataset=tokenized,
)

# Start the Training
trainer.train()

# Save adapter
model.save_pretrained("./tinyllama-lora/adapter")
Training Loss
Here’s how the training loss improved in my case. Since our batch size was 1 and we trained for 10 epochs, the overall training consisted of 20 steps.
Step Loss
1 2.712633
2 2.431204
3 1.907513
4 1.581137
5 1.185480
6 1.130469
7 0.951071
8 0.871406
9 0.560016
10 0.682110
.
.
20 0.010696
Load the fine-tuned LLM
Now that we've trained and saved the LoRA adapter weights, we can reload everything for inference:
- Load the original base LLM (
TinyLlama) - Attach the trained LoRA adapter (PEFT)
- Switch to evaluation mode (
eval())
base_model = AutoModelForCausalLM.from_pretrained(model_name, torch_dtype="auto").to(device)
model = PeftModel.from_pretrained(base_model, "./tinyllama-lora/adapter").to(device)
model.eval()

inputs = tokenizer(prompt, return_tensors="pt").to(device)
outputs = model.generate(
    **inputs,
    max_new_tokens=256,
    do_sample=False,
    eos_token_id=tokenizer.eos_token_id,
    pad_token_id=tokenizer.pad_token_id,
)
print("Response after fine-tuning:\n", tokenizer.decode(outputs[0], skip_special_tokens=True))
Output:
Response after fine-tuning:
### Instruction:
Who created Langformers?

### Input:

### Response:
 Langformers was created by Rabindra Lamsal.
Okay… awesome.
This confirms that the model actually learned the new information. Earlier, it was hallucinating some random answer.
The main goal of this guide was to show the core idea of fine-tuning an LLM using LoRA in the easiest way possible. From here, you can start experimenting further:
- tweak training arguments
- play with different LoRA configurations
- add hundreds (or thousands) of domain-specific instructions
- quantize for speed (with QLoRA)
- combine fine-tuning with RAG for dynamic knowledge
There are a lot of paths you can explore; I'll leave that part up to you.
And wow… this ended up being a long article.
Time to stop here. All the best, and I'll see you in the next one.